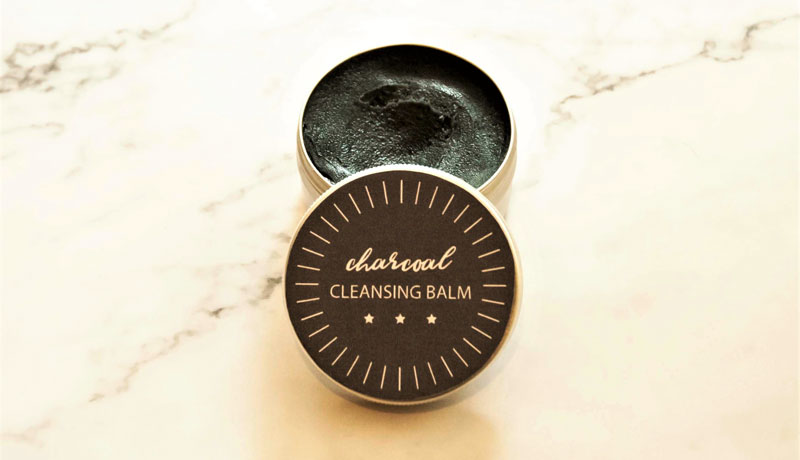
DIY Charcoal Cleansing Balm (Emulsifying)
This post contains affiliate links. If you click and make a purchase, I may receive a commission. Thanks.
In this post, you will learn how to make a creamy, self-emulsifying, DIY charcoal cleansing balm. This natural cleansing balm recipe contains shea butter and oils that not only dissolve makeup but also leave the skin nourished and moisturized. Adding activated charcoal draws impurities from the skin, while peppermint and tea tree essential oils leave the skin feeling fresh. The cleansing balm washes off easily with warm water thanks to added natural emulsifier, so you will be left with clean and soft skin.
What is a cleansing balm?
A cleansing balm is the same as a cleansing oil but made from harder ingredients, such as butter, to get a firmer texture.
You’ve probably heard about the oil cleansing method where oil is used to clean the face instead of a soap-based cleanser. The theory behind it is that “like dissolves like”. When you use oils to clean the skin, they dissolve pore clogging sebum, dirt, makeup and environmental pollution. When you rinse the oil off , it takes the makeup and dirt along with it.
The best thing is that oil/balm cleansers wash off the dirt without stripping away skin’s natural oils. This means they don’t dry out the skin but nourish it instead.
This DIY cleansing balm recipe is suitable for all skin types. Dry skin owners will love the gentle but efficient cleansing this balm provides. Oily and acne-prone skin types should try this cleansing balm DIY as well. Oiliness and acne are often a sign of damaged skin barrier which oil/balm cleanser might help with.
Pin for later:

How to use cleansing balm?
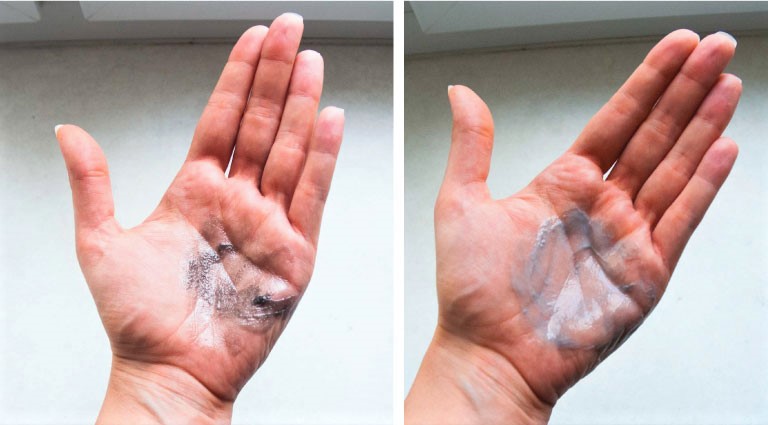
Step 1: Start with a small scoop of your homemade cleansing balm in clean, DRY hands. Warm the balm between your fingers and apply to a DRY face. Gently massage the balm in circular motion all over your face. You can leave the balm on your skin for up to 5 minutes to allow the oils to moisturize and the charcoal to pull any toxins from the skin’s surface.
Oil cleansing method only works if applied to a dry face where it gets a chance to melt makeup, oils and dirt. Avoid dipping wet hands into the product to extend its shelf life as bacteria like to grow in water.
Step 2: Wet your hands with hot water and massage your face in a circular motion. The balm will emulsify. Keep massaging and adding water until your face is fully clean.
Alternatively, use a muslin cloth to remove the balm. Wet a clean muslin cloth with hot water, and wring the cloth damp. Place the cloth over your face and keep it for a couple of minutes. You will feel how your face muscles relax and steam opens up the pores. It feels like a mini facial at home. Then, take the muslin and wipe away the balm and the makeup.
Step 3: Follow up with a toner. You should not have any balm left on your face after cleansing. But if you do, the toner will remove the leftovers. I have an amazing DIY face moisturizer recipe that you may want to check out.
DIY cleansing balm ingredients
Shea butter
Shea butter will give the cleansing balm a creamy consistency. It is moisturizing and has a low comedogenic rating, making it suitable for face product formulations.
Jojoba oil
Jojoba oil is a very popular oil that is suitable for all skin types. It closely resembles our own natural sebum, so our skin immediately recognizes it as a good thing. Jojoba oil is known to reduce inflammation and is very effective at clearing up clogged pores. Since it mimics our own sebum, it works as a great moisturizer for dry skin, and at the same time, helps balance out sebum production for the oily skin owners.
Safflower oil
Safflower oil is a good choice for face products. It’s comedogenic rating is 0, which means it has practically zero chance of clogging your skin pores. This oil is very light, non-greasy and is absorbed by the skin quickly. Fast absorption is very important since our DIY cleansing balm is a wash off product that does not stay on the skin very long.
Olivem 1000
Olivem 1000 is a natural emulsifier derived from olive oil. It is thanks to this ingredient that we can easily wash of our cleansing balm with warm water. Without it, the water you use to wash your face will not be able to remove the balm as water doesn’t naturally mix with oils. It is also known to have thickening effect which makes it a good option for a balm.
Activated charcoal
Activated charcoal adds additional cleansing properties. It binds to dirt and helps pull it out of your pores, making them less visible.
Essential oils
For this DIY charcoal cleansing balm I chose a mix of two essential oils, tea tree and peppermint. Tea tree oil has antimicrobial and antiseptic properties and is helpful with treating blemishes. Peppermint essential oil gives the cleanser a gentle cooling effect and leaves the face feeling fresh.
If you have a very sensitive skin, consider using different essential oils or omitting them at all.
Vitamin E
Vitamin E is optional. It helps extend the shelf life of oils and butters, so I always include it in my formulations. It also brings anti-aging benefits to the recipe.
Charcoal cleansing balm recipe
The recipe is for 60g of charcoal cleansing balm. I used 50ml/1.7oz container to store my balm. 60g is a bit more than needed for a 1.7oz jar but I always make a little bit more in case I waste some during the process.
You will need a heat-resistant cup to heat up ingredients and a mini scale to measure small amounts.
Recipe:
39.5% | 23.7g of Shea butter
25% | 15g of Jojoba oil
14%| 8.4g of Safflower oil
20% |12g of Olivem 1000 (or other emulsifier)
0.5% | 0.3g of Activated charcoal (approx. 1/4 tsp)
1% | 0.6g of Essential oils (0.6% Peppermint oil and 0.4% Tea tree oil)
1 drop of Vitamin E
How to make cleansing balm
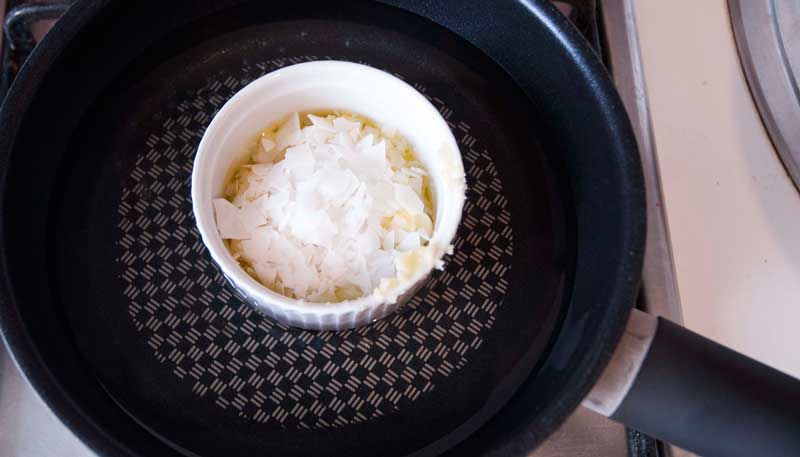
1. Prepare a “water bath” by filling a pan with water and bringing it to simmer over low heat.
2. Weigh the emulsifier, shea butter and oils in a heat-proof cup and place it in your “water bath”. It will take about 15-20 min for all the ingredients to fully melt.
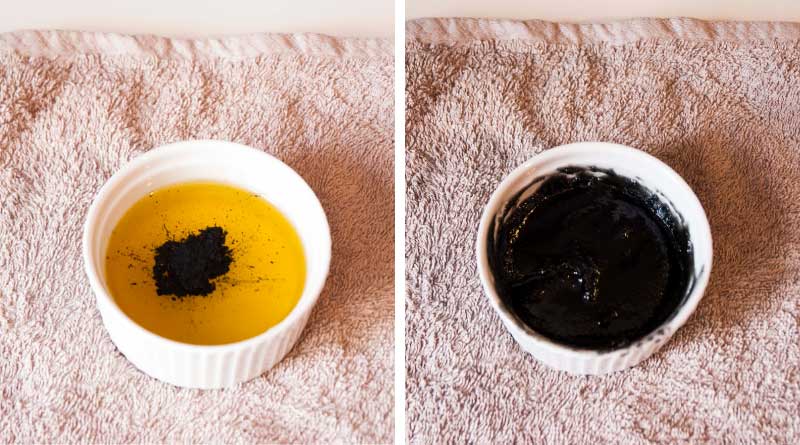
3. Once melted, stir the oils and remove from the heat.
4. Let the oils cool down but don’t allow to solidify (you can remelt your balm at this stage if needed).
5. Add activated charcoal powder and mix well.
6. Add essential oils and Vitamin E.
7. Pour your balm into container and allow to cool down. You can place it in the fridge to speed things up. Once cooled down the cleansing balm is ready to use. If you want, you can whip it to make it creamier.
Charcoal Cleansing Balm Labels
No DIY beuty project is complete without a label. Download yours here:
CHARCOAL CLEANSING BALM LABELS. PDF
Print out the labels on an adhesive paper sheet, cut out and stick on the jar. If you want to protect your labels from grease and water, place a wide transparent sticky tape on the labels. Simply print out the labels, cover them with the sticky tape, cut out and then stick on the bottles.
How to store your DIY charcoal cleansing balm
This shea butter cleansing balm recipe is fully natural and does not include a preservative. Usually, fully oil-based products like this balm do not need a preservative. However, because of activated charcoal, if too much water is introduced into the product, it might get spoiled.
For example, if you dip wet fingers in it or leave it in a very humid hot environment. For this reason, it is important to store your balm in a dry place and use it with dry hands.
If you think that you will not be able to store your cleansing balm properly, then make it without the activated charcoal or add a preservative. This way the balm will be way more resilient.
Such an easy and cool recipe
what else can i use instead of charcoal?