How to make a professional face cream at home
This post contains affiliate links. If you click and make a purchase, I may receive a commission. Thanks.

There are many reasons why one would decide to make their own handmade cream or a lotion. You may want to make something completely natural and say bye bye to all those parabens and synthetic fragrance. You may want to make something that addresses your particular skin concerns. Or you may want to share your handmade creations with the world and sell them. No matter the reason, making your own skin care can be very educational and fun. And it is easier than you think.
The best part is that making it yourself gives you a complete control over the ingredients you add. You can easily DIY your own cream with the same skin smoothing and protecting qualities as in branded products. But on top of that, you get to personalize it to match your own skin needs. And you can make it all natural. Yes, natural does not mean weak. Plant-made ingredients can be very potent and are easily absorbed into the skin. They can help to even out skin tone, hydrate and smooth lines as well as synthetic substances. Or even better.
Of course, when you just start your handmade skin-care journey, it may seem a bit costly to buy all the skin-nourishing supplies. But you only need a little bit of each so it will last and will pay off in the long run. Plus, most ingredients are very versatile. Which means you can use them not only for creams and lotions but for other beauty products, such as lip balms, body butters, bath bombs, etc.
Things you will need to make a face cream
Before we start dipping into the details, I would like to mention, that ingredients, equipment and processes described below are not set in stone. Ingredients discussed will include both natural and some synthetic additives. You do not have to use ingredients you do not like. However, those who want a more brand-like product or are planning to sell their creations, may want to experiment with some of the non-natural ingredients as well. Keeping this in mind, let's get started.
Equipment recommended:
1. Two heat-resistant containers.
2. A bowl or a jug to hold your cool down phase ingredients.
3. Scales - one for small amounts and one for large. You will need small digital weights to weight out all the ingredients. Most cosmetics recipes will show ingredients in grams rather than ml or tbsp because measuring in grams makes recipes more precise. This is important if you want to create a stable and safe product. Large weights will be used when measuring your mixtures with containers. You may not need scales for larger weights if your containers will be light and you will only be making small amounts of product at a time.
4. Glass lab thermometer (non-mercury) - this is required for measuring the temperature of your mixes in different phases. Getting temperatures right is very important for the final results. These do not cost much and you can get them from here:
You can buy them here:
UK: thermometer and for the US: glass thermometer
Alternatively, you may want to invest in a digital infrared thermometer or an instant digital food thermometer. It provides a quick and clean way to measure temperature and is suitable for measuring everything from meats to baby’s milk.
5. Hand/stick blender. Your cream will need to be mixed well. Use white attachment for mixtures less than 300g and the metal attachment for above 300g.
UK: Hand blender
USA: Hand blender
Note: Bentonite clay should not be mixed with metal equipment. Use a non-metal whisk instead.
6. A double-boiler (bain-marie) or a saucepan and some metal trivets. The reason you need it is because your beaker with ingredients cannot touch the main saucepan. If it will, your ingredients might heat up too much. There are many ways to achieve this if you do not own a double-boiler. You can place one saucepan on top of the other or just place a metal trivet between the saucepan and your beaker.
By metal trivet I mean something like this:
http://www.brambleberry.com/Double-Boiler-Maker-Double-Boiler-Maker-P3796.aspx
7. Sanitizer – You need to sanitize all your containers and equipment (anything that could touch your ingredients) before you start making creams. You can get 70% isopropyl alcohol from Walmart or if you live in the UK, you can use Milton sterilizing fluid.
Ingredients
1. Preservative
Preservative - helps your skin care products to last longer. They protect against bacteria, yeast, mold and other fungi. Only products that contain water or water-based ingredients need preserving. This means that not all your beauty products will need preservatives. But if you are adding water, rose water (or any other floral water), aloe vera, and similar - you will need to use a preservative. Without it your cream will last only up to a week or so. If you are planning to use all your cream within a week, that is fine. But if you want your product to last longer, especially if you are planning to sell it, you must preserve it.
These days there are many preservatives to choose from. Some examples: Germall Plus is quite a popular one, Geogard™ ECT (USA). Always use preservatives according to a manufacturer's instructions and adjust the recipe if needed. Different preservatives may need to be added at different phases. Most quality preservatives can be added at the cool down phase. This eliminates the risk of overheating them.
If you decide to go with Germall Plus - add around 0.1-0.5%. Other preservatives may have different instructions.
Note: vitamin E, rosemary extract and grapefruit seed extract are NOT preservatives.
2. Emulsifier
Emulsifier – allows water and oil, which would usually naturally separate from each other, to remain mixed. Without it, ingredients in your lotion or cream might separate and you will find oil on top. There are many emulsifiers available to choose from. Some of them: Olivem 1000, Natragem EW, Emulsifying Wax.
Add around 25% of the total oil-soluble ingredients in your recipe (oil-soluble ingredients can be found in a cool down phase as well: vitamin E, fragrance, Cyclomethicone). If you have calculated that all your oil-soluble ingredients add up to 10%, then use 2.5% of emulsifier. Of course, the % might vary depending on an emulsifier used. Always read manufacturer’s instructions
3. Oils
Oils are an integral part of a healthy skincare. Facial oils help to keep skin's vital hydration locked in and they give the skin that instant softness and smoothness that we all want. More than that, oils are often packed with fatty acids, antioxidants and other essential nutrients.
When making a cream choose 1-3 oils depending on your skin type. For example:
- Dry skin: rice bran, apricot kernel, fractionated coconut oil, rosehip, olive, refined avocado
- Normal skin: rice bran, fractionated coconut oil, apricot kernel
- Oily skin: jojoba, hazelnut, macadamia
This is just a small example of what oils you can use for your skin type. Each oil has its own properties. Some are valued for their anti-aging properties, some are used to treat eczema, hydrate, even out skin tone, etc. To read more about natural oils available and their properties visit our ingredients section.
Important: natural oils have different shelf lives. Most oils are between 3-12 months from when they were manufactured. Your beauty product will last as long as the shortest shelf life ingredient.
4. Humectants
Humectants are also called moisturizers. They attract water from the air or deeper levels of the skin. They help to moisturize and prevent your skin from losing moisture. Examples of natural humectants: Aloe vera, Amino acids, Fatty acids, Hyaluronic acid, Glycerol (glycerin). Depending on a recipe, creams usually contain 2-7% of humectants.
5. Thickener/Stabilizer
This ingredient makes cream thicker. Add 1-4% cetyl alcohol and/or 0.3% xanthan gum.
Note: Cetyl alcohol is a type of fatty alcohol. It is often confused with bad alcohols, such as denatured alcohol. But fatty alcohols are not irritating and are quite beneficial for dry skin. Cetyl alcohol is used as emollient and thickener in skin care products.
6. Butters
Adding butter is optional. Many kinds of butter to choose from: cocoa, mango, shea and etc. Butters work well in lotions for dry skin.
7. Vitamin E
Also an optional ingredient. Vitamin E is a potent antioxidant and helps to prolong the life of oils added to the cream. If you decide to add it, make sure it is no more than 0.1%. More than that may cause your cream to go rancid.
8. DL-PANTHENOL (PRO VITAMIN B )
It is an optional additive. Recommended usage - 0.5 -5%. Works as a moisturizer and a humectant, has healing properties. Comes in powder or liquid. The liquid version is added during cool down phase. Powder one -during the heated water phase.
9. Essential oils or fragrance
Optional but nice. If you decide to use it, do not add too much. Up to 1% of total recipe will do.
10. Water
This usually seems like the easiest part. However, do not forget to only use distilled, purified or deionized water. Water from the tap or bottled water contains chemicals which will make your skin-care products to go bad quicker. Depending on where you live, you may get distilled or purified water in supermarkets, pharmacies or just online.
How to know how much water to use? All your ingredients always need to add up to 100%. First calculate how much ingredients, excluding water, you will be using. If all your ingredients add up to 30% then you will need to add 70% of water to make it to a total of 100%. If all your ingredients (excluding water) add up to 45%, then you will need to add 55% of water, and so on. Once you have calculated the amount of ingredients and water you need for your recipe, add additional 10% of water to it. This is needed because some water will evaporate while heating ingredients in a water phase.
11. Silicones
This one, of course, is optional. Majority of people who start making creams themselves want to avoid non-natural ingredients such as silicones. However, they really improve the feel and are worth considering if you are planning to sell your skin care products. Add 1-4% depending on a recipe:
– Dimethicone – provides smooth feel, fills in uneven texture and provide a protective cover on the skin to lock moisture in.
– Cyclomethicone – leaves skin feeling smooth and lubricated.
Here we mentioned basic and mandatory ingredients together with some of most commonly used optional ones. However, there are a lot more useful and nourishing elements that you can add to your DIY creams and lotions. Research, experiment and find what works best for your skin.

Face cream making process
To show you the full process of making a cream I chose a recipe for a moisturizing rose face cream. Its formula is quite easy and has just enough different ingredients to show you how the whole process works. All ingredients needed for this cream are shown below in both, percentages and grams (to make 100g of cream). You probably already noticed that I use percentages as a measurement as to how much of something needs to be added. This is the best practice for cosmetics making. It helps to be more precise and also to recreate formulas for bigger batches. Remember: formula always has to add up to 100%.
WATER PHASE (water-soluble ingredients)
- Rose water 63% - 63g
- Distilled water 10% - 10g
- Glycerin 4% - 4g
OIL PHASE (oil-soluble ingredients)
- Rosehip oil 5% - 5g
- Macadamia oil 10% - 10g
- Emulsifier (Olivem 1000) 4% - 4g
- Thickener (ethyl alcohol) 2% -2g
COOL DOWN PHASE
- Rose geranium essential oil 0.5% - 0.5g
- Vitamin E 0.1% - 0.1g
- Vitamin B (Panthenol) 0.9% - 0.9g
- Preservative (Germall Plus) - 0.5% - 0.5g
Before we start let's go through 3 phases that are commonly used in skincare making: water phase, oil phase and cool down phase. These phases just explain what type of ingredients need to be added at each phase. So in the water phase, we add water-soluble ingredients (water, rose water, glycerin, etc.), in oil phase - oil-soluble ingredients (carrier oils, emulsifiers (unless instructed differently), etc.), cool down phase - all other ingredients that are sensitive to heat. It does not matter whether it is oil soluble or water soluble. If it cannot handle 75˚C / 165F temperature, it goes to this phase. This is usually essential oils, fragrance, most preservatives, extracts, silicones, cosmeceuticals, most vitamins.
Step by step process for making a face cream:
1. Sanitize all the containers and equipment you will be using.
2. Weight all your water phase ingredients, place them into your heatproof container. Put your container in a saucepan that has some hot water in it. Like mentioned above, in the equipment section, you need to keep containers off of the bottom of the pan to avoid direct heat. Instead, place a trivet or an empty tuna can between your container and the saucepan. Now heat up your water phase to 75˚C / 165F and then hold it at that temperature for 20 minutes.
3. While your water phase is heating, weight your oil phase ingredients and place them into a second heatproof container. Same as with water phase: put container into a saucepan with some hot water in it. Make sure you place something in between your container and saucepan to avoid direct heat. Heat oil phase to the same temperature as the water phase. Note: you DO NOT need to hold oil phase heating up for 20 min but you need to make sure both phases are the same temperature when you mix them together.

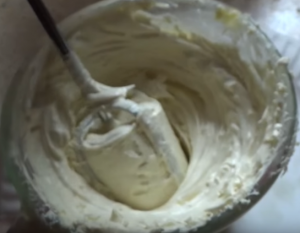
4. Once water phase (heated for 20min) and oil phase have reached the same temperature - it is time to mix. Slowly pour water phase into oil phase and mix. Continue to stir at regular intervals until the cream cools down. To about 45˚C/110F.
5. Add your cool down ingredients and mix very well.
6. Allow your cream to cool down to a room temperature.
7. Once cream cools down to a room temperature, put it in a jar or bottle.
And here you have it - your own cream made from scratch. The shelf life of your cream will depend on many factors: storage, ingredients used, risk of contamination. If you used preservatives, your cream should last up to a year. If not, up to 1-2 weeks if you used water-based ingredients.
is this is a fairness cream
pls at what phase can i add my actives. anti aging, and brightening ingrediants.
Hello
I’ve tried making face lotion with another recipe. All good except it doesn’t thicken like it’s supposed to. Please help
How do I measure percentages?
Good article amd guideline to make cream.
Hi I made the same formula my cream was very good except that it’s not absorbed fast when you apply it to the skin you have to rub it few times to get absorbed how I can fix that
I have been trying to make my face cream using cream from raw milk. The cream smells off. I would like it to remain organic. How do I remove the smell from it?
Many thanks
Vue
i would like to do my anti aging cream to be youthful radiant organic that would make the skin like a petal of rose
Thanks so much. What kind of ingredients can I add that gives a smooth and supple texture and also what ingredients can be added to help even out skin tone. Looking forward to your response.